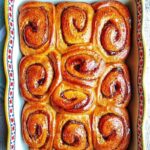
Description
Homemade cinnamon rolls recipe is easy, tasty, healthy, and simply the best sticky buns because you made them from scratch! These healthy cinnamon buns are just 406 calories and equally as delicious and comforting as those from the Cinnabon shop! These homemade cinnamon rolls make for a great breakfast on special mornings, brunches, or desserts. The best thing is that you can always bake them ahead, keep them in the fridge or freezer, and simply heat up and enjoy at wish!
Ingredients
- For the dough: 3 cups of flour
- 1 packet of yeast
- 6 tablespoons of vegetable oil
- 1 teaspoons ground cinnamon
- 1/2 teaspoon of salt
- 1 egg
- 3/4 cup yogurt (I used low vanilla fat); milk works as well.
- 1/4 cup of coconut sugar
For the filling:
- 11 Medjool Dates
- 3 tablespoons of plant butter (I used this one from Country Crock)
- 1/2 teaspoon of salt (or less)
- 1/4 cup of coconut sugar
- 2 teaspoons of ground cinnamon
Glaze/Topping:
- 3/4 cup of powdered sugar (icing sugar)
- 1 – 2 tablespoons milk
- 1 teaspoon of Vanilla extract
Instructions
- Warm up the oil and yogurt; then beat the egg and sugar, and add the yeast. Add the sugar mixture to the oil/yogurt mixture.
- Add all dry ingredients into the food processor, start processing at low speed, gently add the wet ingredients as you process, stop after it forms a dough.
- Remove the dough and knead a couple of times into a rounded dough. Oil a pan, place the dough, and cover tightly with a cling film. Allow rising for an hour to an hour to two. You can also leave it overnight. The goal here is for the dough to double in size.
- For the filling: Soak dates in hot water early on to soften. Add dates to the food processor, add the butter, or plant butter, cinnamon, salt, and coconut sugar. Process until smooth; if “too dry,” add a teaspoon of maple syrup or water to loosen. Finish processing and set aside for use later.
- Place rose dough on a clean working surface and roll out using a rolling pin. Possibly roll it out in a rectangular form.
- Then dump the filling in the middle of the rolled-out dough and gently spread it to reach everywhere except the very ends.
- Then roll up, ensuring that fillings are intact and not falling out. Gently, use a serrated knife to cut into equal sizes and place on a well-greased baking dish.
- Cover tight and place in a warm place, prove/proof for about 1 hour to an hour and a half; I typically do an hour. Give the dough enough time to double in size, and do not “over prove dough.”
- Then bake in 375 preheated oven for 25 – 30 minutes, place foil in the 20th minute if you don’t want it too toasty! Also, feel free to bake it for longer if you want it toastier.
- To make the Glaze or icing: add icing sugar or powdered sugar to a bowl, add vanilla extract and milk. Whisk together until combined.
- Pour the glaze on the buns as soon as it comes out of the oven! This way, it melts into every corner of the buns and makes them stickier and gooier. Serve and enjoy with family/friends.
Notes
If you put the glaze immediately the rolls come out of the oven it will melt into them (which is superb, BTW). However, if you prefer to see the frosting, wait for at least 7 – 10 minutes before frosting/glazing.
Measure the flour correctly, and do not flour your surface when rolling out the dough (if possible)
You can easily sub yogurt with milk; I have made this recipe using both. I personally use yogurt most often because I love richness vibes it gives.😂🤷🏾♀️
Make the date filling while waiting for the dough to rise; relatively make the glaze when the dough is baking.
Feel free to customize to suit you! Make sure to check out the video for step-by-step video guidance!